Should My WordPress Site Have HTTPS?
Have you been hearing a lot about HTTPS and SSL? Do you even know what people are talking about?
Well, we are here to make sure you understand it, along with seeing your site gets on HTTPS as soon as you can. It’s no longer a question of “should my site have HTTPS?”, but of “how quickly can I get my site on HTTPS?”.
So, short answer is “YES”!
Why is HTTPS Important?
OK, so I don’t want to make your head spin here, so I’m going to keep this simple. Let’s chat about SSL.
SSL encrypts the information going from your browser to the web server. Basically, when you input information into a form and hit submit, when SSL is enabled, it encrypts that data as it transfers from the browser to the web host’s server which houses the website. This is a good thing. It means someone can’t steal your information as it’s being transported (or it makes it much harder).
When you don’t have SSL enabled, all data transferred from your browser to the web server is available for someone who knows what they are doing to intercept.
This is why Google (and soon the other browsers) are working hard to make the web more secure. The more secure websites there are, the better off we are.
For the longest time, having HTTPS meant secure, and it still does. Unfortunately, there is a misconception that you only need HTTPS if you are using e-commerce on your site. That is longer true. You see, a few years ago, Google decided it was going to start adding secure sites into their ranking algorithm. It’s part of their 200+ ranking points that help you get traffic from Google.
Not only that, but about two years ago, Google decided they were going to take it one step further and start labeling sites that don’t use HTTPS as “NOT SECURE” in the browser bar of Google Chrome. You know, the most popular browser in the world. They mentioned this two years ago and rolled it out in August of 2017.
When that Google Chrome roll-out happened, they only started labeling pages on a site that were collecting information. This included your WordPress login pages, pages with contact forms, search forms, and opt-in forms. Even all your posts that had comment forms on it. Anything that someone could put in information was labeled as “NOT SECURE” in the browser.
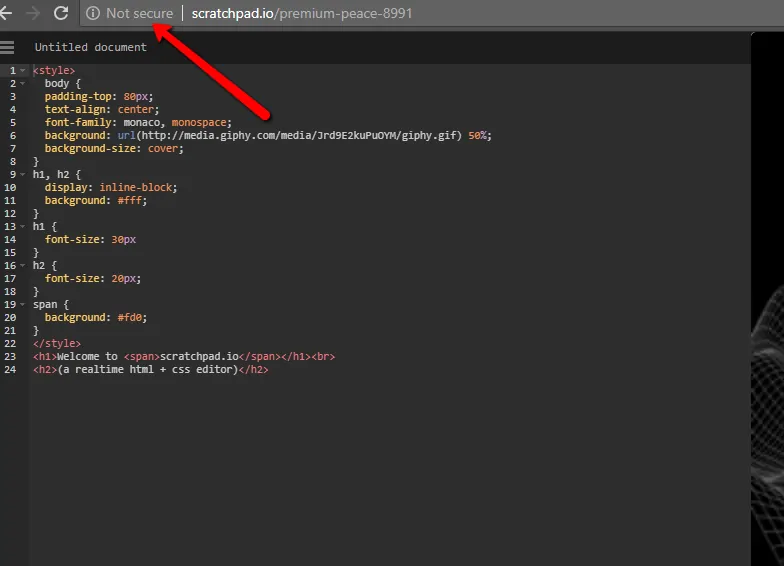
Fast-forward to July of this year (2018), Google pushed out a new Chrome update that started labeling any sites with the exact same browser bar “Not secure” message. No, it doesn’t matter if you don’t have any forms.
If you don’t have HTTPS on your site, your are now labeled as Not secure. Not good!
Google has made indications they will soon make this warning red in an upcoming release of Google Chrome, and then maybe even more ominous in future releases.
How You Can Switch to HTTPS
OK, the good news for those not on HTTPS, is you can get it done.
The first step you need to do is make sure your host provides SSL certificates. Most now provide them for free. If you have to pay for a SSL certificate, you need to think about moving hosts. Seriously, ever host should provide you with a SSL certificate for free. There are no excuses anymore and this is just a pure money grab for them.
No Hassle HTTPS Switch Service
Once you have a SSL certificate installed on your server, there are a few steps to take. Please note, this is going to get technical. If you’re not comfortable with this kind of stuff, we can do it for you and you don’t have to do much. Just contact us if you want our help.
Here’s a little rundown of what you should do and how to prepare…
- Contact your host to see if they offer any free SSL certificates. Many offer Let’s Encrypt (like SiteGround and BigScoots) that can be installed for free. Others are working on implementing them. There are big hosts out there, such as GoDaddy, and many others who used to make a lot of money selling SSL certificates. They would charge $100+ a year for a certificate. This is highway robbery for most folks (I’ll show you in the next step). Bluehost does have free SSL certificates now, but they have many issues with not renewing and they ask you to pay for one. Don’t do it! Get them to fix any issues.
- If your host doesn’t offer free SSL certificates, then ask them how much their certificates are. If it seems expensive to you, then it probably is. We suggest heading over to Namecheap for a really well-priced SSL certificate. It’s only $9 per year. If you do this, you’ll need your host to generate a CSR for the certificate. Your host’s support can help you with that request. The other option here is to move to a host that supports free SSL certificates. There is no excuse anymore.
- Once you get your certificate, ask your host to install it on your server. They will need the files that you get via email once the order is complete, but you can just submit a request for them to install it.
- If you have a host like SiteGround or one that offers Let’s Encrypt, you can typically just add an SSL certificate right from within your control panel. Just look for a Let’s Encrypt icon. SiteGround actually now just adds a certificate to every domain they transfer in or register on their site to make life a little easier. This rings true for many, such as BigScoots as well.
- If you have an add network, make sure to reach out to them to make sure they support SSL and HTTPS ads. I know Google Adsense, Amazon CPM, MediaVine, and AdThrive support ads over HTTPS. I’m not certain of any others.
- Now it’s time to implement on your WordPress site.
Setting Up WordPress with HTTPS
Here comes the fun part everyone. Getting the certificate was the easiest part. Before you do anything, please DO A BACKUP OF YOUR SITE!!
Did you get that? Please backup your site. If you don’t know how to do that, please contact us and we will do everything for you.
After you’ve done that, let’s first try to see if we can get your admin dashboard to load over HTTPS. In order to do that, go into your dashboard, click on Settings > General and then change the WordPress Address (URL) field to https:// on your domain. Leave the Site Address (URL) field alone for right now. Once you save, it will immediately log you out.
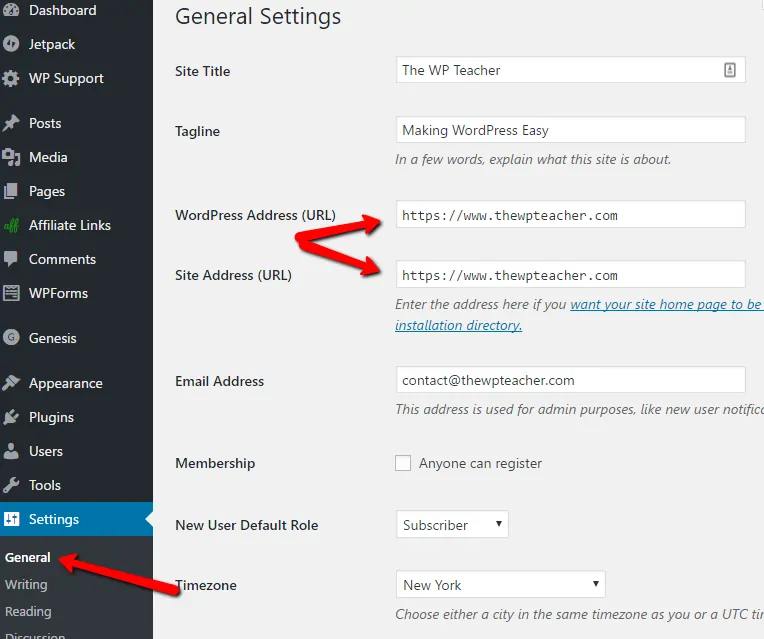
Once you do that and it shows HTTPS in your browser bar, then you can go back into Settings > General and change over the Site Address (URL) field to https://. This will make the front-end of your site load over HTTPS.
We used to recommend a plugin, but then realized you’d have to keep it on your site forever and if it breaks, then so does your HTTPS integration.
The next step is to install the Better Search Replace plugin. After you active it, you can find it under the Tools menu in WordPress. It will open a little area that is a pretty simple form.
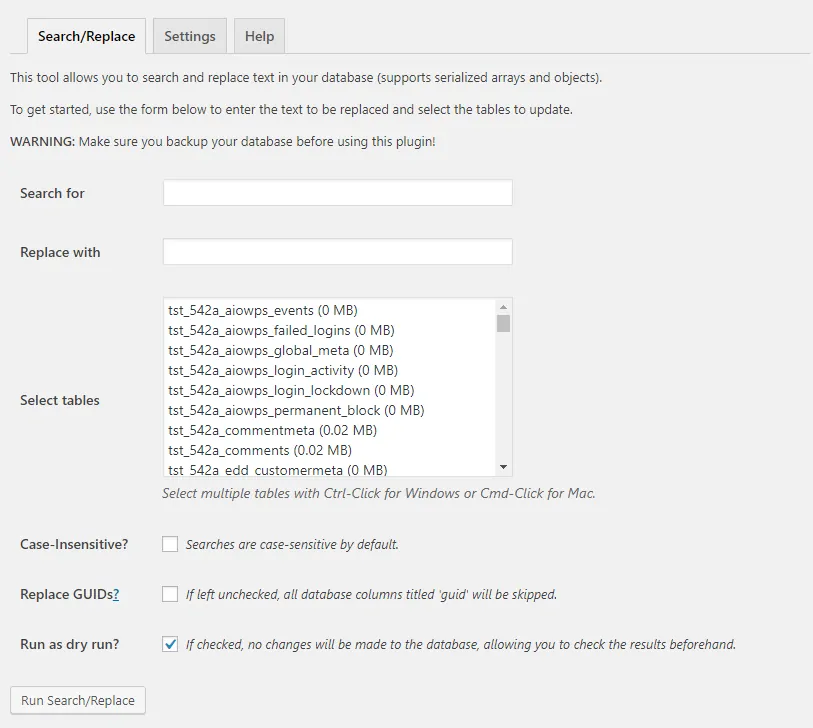
In the Search for box, put your old HTTP blog address (don’t include an ending / in the URL).
In the Replace with box, put in the new HTTPS URL.
The tables to select are usually something with:
_commentmeta
_comments
_links
_postmeta
_posts
You can keep the “run as a dry run” selected and then hit the Run button. If it comes up with numbers, then go back and uncheck the dry run box and run it again. This will replace your database.
The next step is to check your site to make sure the green lock comes up. If it doesn’t, then you have mixed content issues. These are typically fonts loaded into your theme or badges, images you added linking to a different site. Look in your widget area for those.
The most important step after this is to setup a redirect on your server. If you don’t know how to do this, ask you host. If you do, Go to your cPanel or File manager and find your .htaccess file in your files.
Add this to the top*:
# BEGIN HTTPS REDIRECT
<IfModule mod_rewrite.c>
RewriteEngine On
RewriteCond %{HTTPS} off
RewriteRule ^(.*)$ https://%{SERVER_NAME}%{REQUEST_URI} [R=301,L]
</IfModule>
# END HTTPS REDIRECT
*Important, this code works on most servers, but there are some like TechSurgeons, DreamHost, and a few others this code will break your site and cause a redirect loop. Do not use this code for those. Reach out to your host to ask for the best code to work with it.
If you’re not sure how to do this, please just ask us. We charge very little and can get it done right with all the redirects as well.
Are There Any Next Steps?
Once you get your site loading over HTTPS, you need to make sure you handle three things.
- Change your URL in your Google Analytics account over to HTTPS
- Add the HTTPS version of your site into Google Search Console (formally Google Webmaster tools). Google views HTTPS and HTTP as two different versions of a website.
- Make sure your links are working from social networks. Basically, make sure your http links are redirecting to https. This is very important and a step many forget.
OK, there’s your rundown on SSL, HTTPS, and WordPress. I know it’s a lot to think about.
If you have any questions or this is overwhelming and you’d like someone to just take care of it for you, we’d love for you to consider us for the work.

