How to Easily Install Google Analytics GA4
On March 26, 2022, Google announced the end of what we all know to be “Google Analytics” or what we refer to as “GA”. Many aren’t even sure what universal analytics even is, but it’s just your standard setup of Google Analytics. Most users run free accounts (so do we) and it’s the gold standard for web tracking.
If you want to advertise, get into an ad network, or do sponsorships, you need to be running Google Analytics. This is what advertisers refer to when they want to know your stats.
Over two years ago, Google came out with their next version of Google Analytics, which is referred to as “GA4” since it’s the fourth version of their platform. This was a huge change that most have not jumped into. Ad agencies, ad networks, and other brands still do not use it or can’t use the data from it when analyzing your site for a deal. But they will have to get up to speed, as GA4 is going to become the standard.
If you’re not sure you want to take on this change/addition, let us know and we can help. You can contact us here. You can also just order a quick fix and we will do it for you to make your life easier.
If you are on our monthly support plans, please contact us and we can help.
When is the old Google Analytics being Retired?
The good news is Google is giving us plenty of time to start changing over. Universal Analytics is going to stop tracking on July 1, 2023. Then they will give us at least six months to access the historical data. My hope is they will give us all an easy way to export all our data for every property. Some of us have been blogging since 2004 and have years and years of quality Google Analytics tracking data.
So we have over a year (at the time of this post) to get GA4 installed and tracking. Luckily it takes about 5 minutes to do and I’m going to show you how. If you don’t want to deal with text and screenshots, then you can just jump down to the video.
How to Setup GA4 to Track Alongside Universal Analytics
For those thinking you have to just stop the current setup of Google Analytics cold turkey, you do not!
You can actually run both Universal (what you’re used to) and GA4 (the new one) concurrently on the same site because they are actually two different properties. So this is a perfect time to get it setup, so you can get a little over a years worth of data in the new GA4 property before Google retires Universal.
This process takes about 5 minutes and the hardest part will probably be figuring out how you actually integrate Google Analytics into your site. Since it’s different for each site and there about 100 ways to actually add tracking code to a site, I’m going to run over the most common way we see it, using the Insert Headers and Footers plugin.
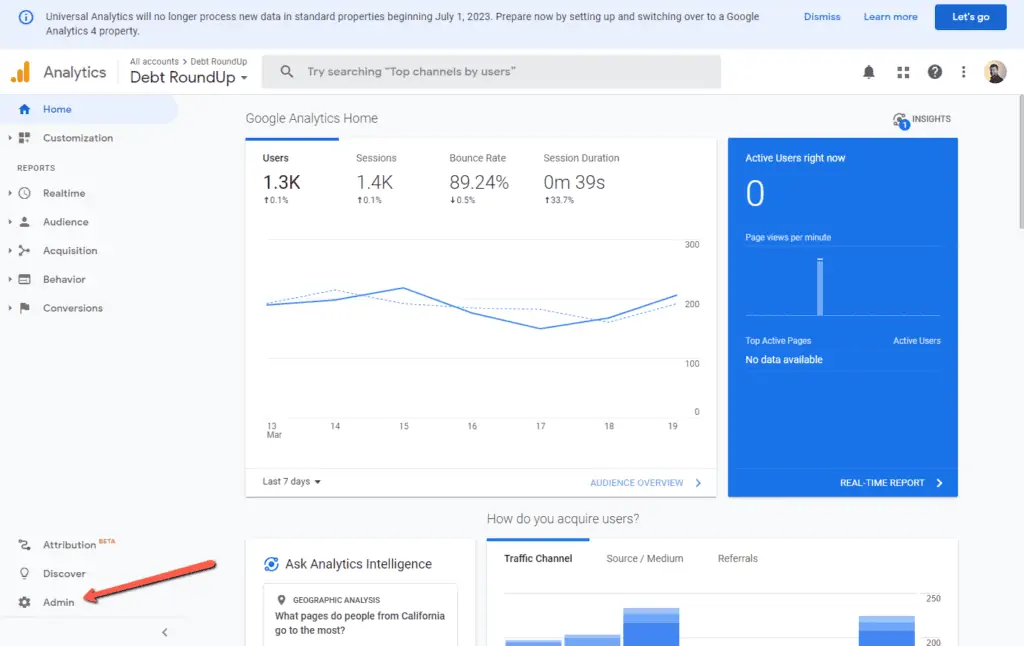
Step 1 – Log into your GA account and click the admin in the lower left corner.
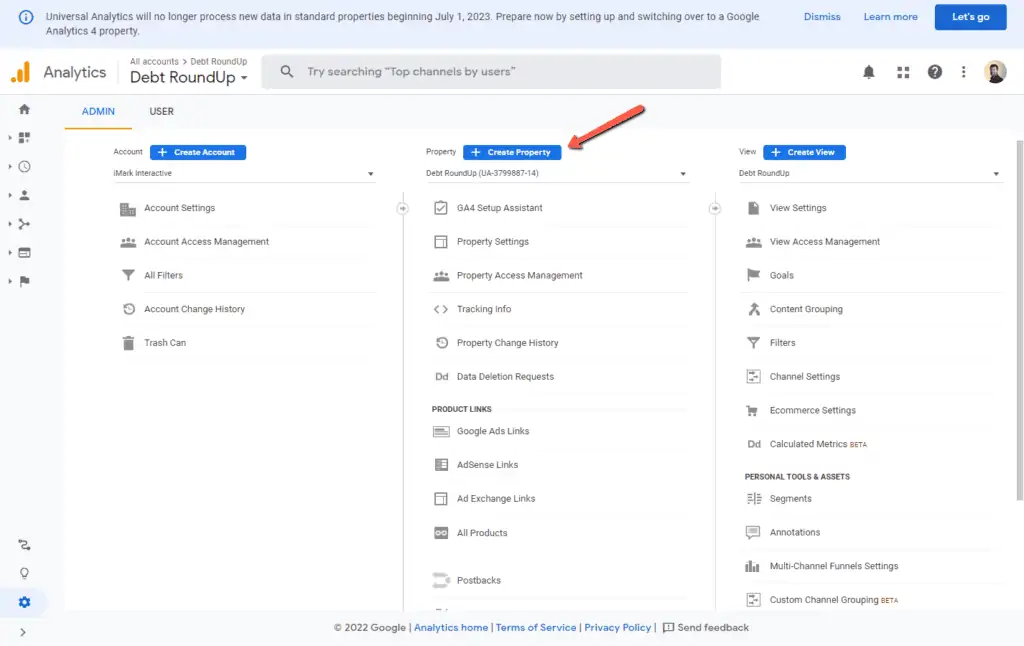
Step 2 – In the middle property column, click “Create Property”
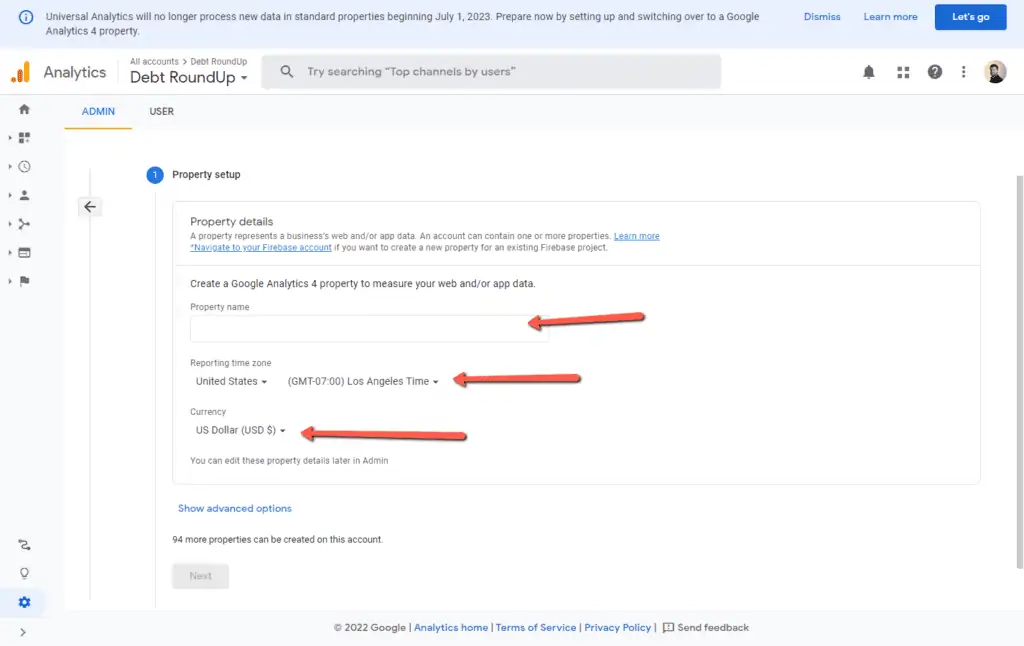
Step 3 – Fill in the property details
You will want to name the property (I usually recommend just your website name and then add “GA4” so you know)
Select the reporting time zone. It would be good if you have it set to the same time zone you live in. If you have an ad network, some of them want the time zone to be New York (EST)
Select your currency.
Hit the “Next” button
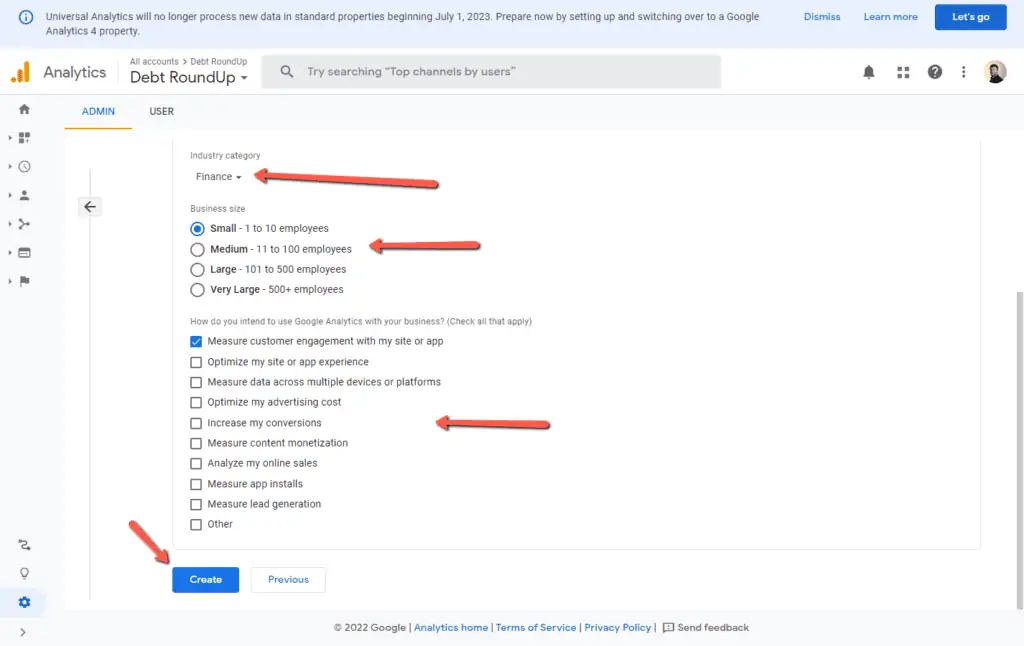
Select your Industry category (if you can’t find one that matches, just pick other)
Select your Business size
Choose what you want to measure. I typically just click the first box as this step doesn’t have any bearing on anything.
Click the “Create” button.
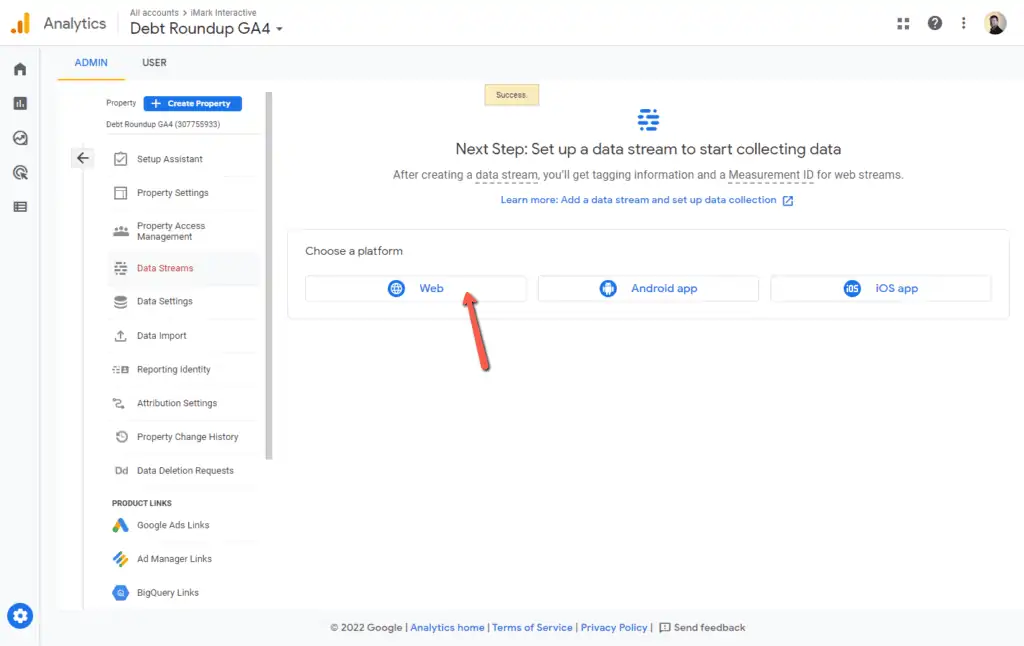
Step 4 – Choose the web platform to create your data stream
Unless you are using an Android or iOS app, you will pick web as your platform.
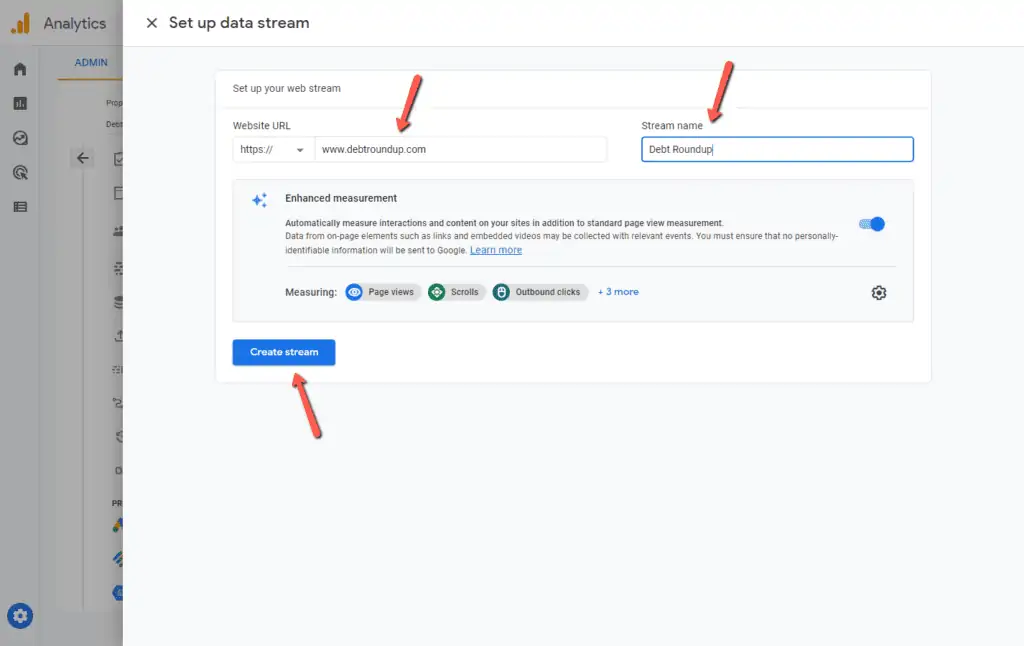
Fill in your URL (make sure your protocol is correct – HTTP vs HTTPS) and make sure you URL is exactly as it is in the browser. If it has www, include it. If not, do not include it.
Name the Stream whatever you want. I typically just use the site name.
You can deselect some enhanced measurements by checking the little cog wheel, but I recommend keeping this all the same.
Click the “Create stream” button.
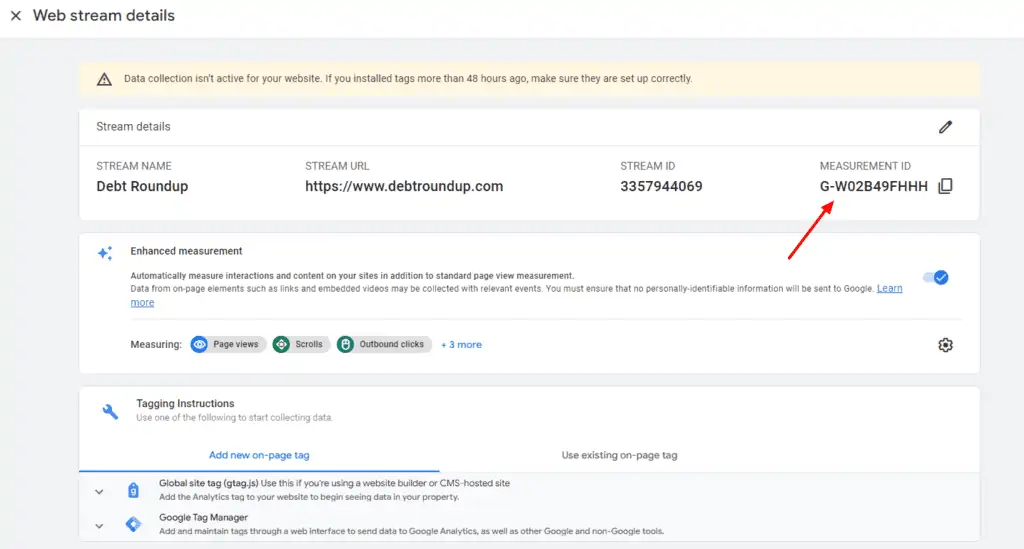
Step 5 – Copy the new tracking ID
You will only need to grab the new tracking ID, but for GA4, it’s called the Measurement ID. This starts with “G-“.
Step 6 – Go to your site and find your tracking
This step is going to be very different for each site. You will need to look through your current site to see how Google analytics was implemented. There are about 100 ways you can do it, so it might be through a plugin, the theme, the customizer, etc. Find this out first.
If you use the Insert Headers and Footers plugin (now called WPCode)for your tracking codes, then you will find the code and change it slightly to make it work with both GA4 and Universal analytics.
Here is an example of the new code:
<!-- Global site tag (gtag.js) - Google Analytics -->
<script async src="https://www.googletagmanager.com/gtag/js?id=G-XXXXXX"></script>
<script>
  window.dataLayer = window.dataLayer || [];
  function gtag(){dataLayer.push(arguments);}
  gtag('js', new Date());

  gtag('config', 'UA-XXXXXX');
  gtag('config', 'G-XXXXXX');
</script>
So you will see in here that you have three places to replace your tracking codes. There are two places for GA4 and then one for universal. GA4 goes in the first and third place and Universal in the second (where the XXXXX are).
Here is what it should look like.
<!-- Global site tag (gtag.js) - Google Analytics -->
<script async src="https://www.googletagmanager.com/gtag/js?id=G-W02B49FHHH"></script>
<script>
  window.dataLayer = window.dataLayer || [];
  function gtag(){dataLayer.push(arguments);}
  gtag('js', new Date());

  gtag('config', 'UA-3799887-14');
  gtag('config', 'G-W02B49FHHH');
</script>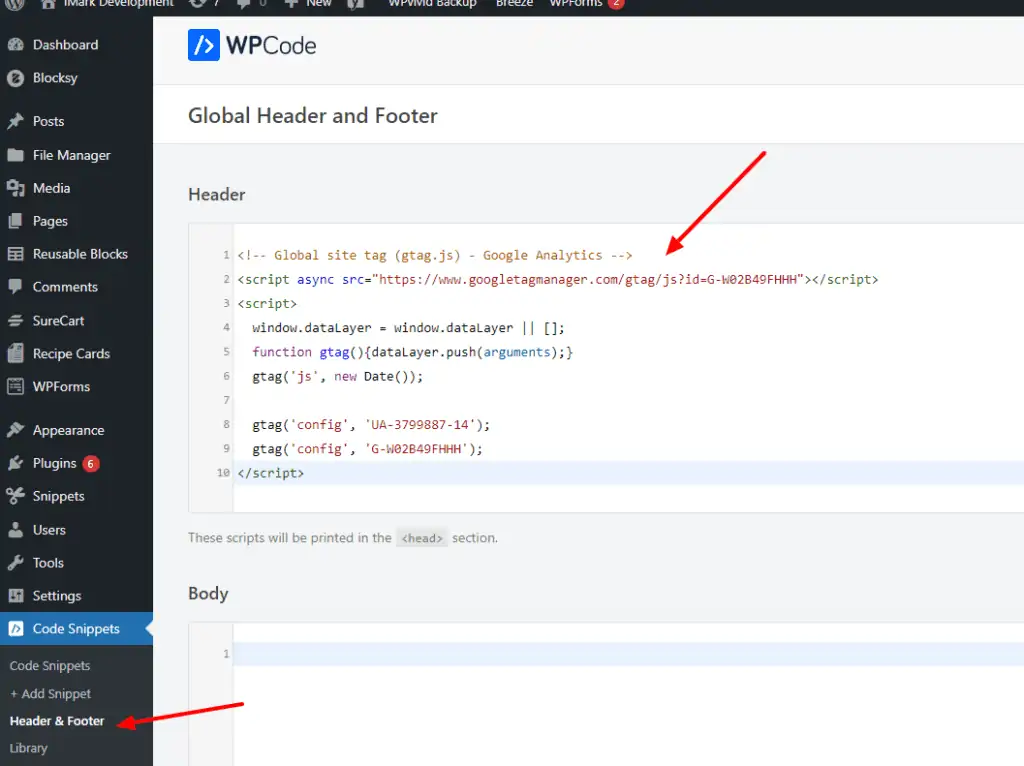
If you use something like Monster Insights or Exact Metrics, you can grab just the Measurement ID from Step 5 above (starts with G-) and go into the settings of either of these plugins and there is a dual tracking option where you copy in the new ID and hit save.
If you use the GA Google Analytics plugin, it doesn’t currently support dual tracking, so you will need to install the Insert Headers and Footer plugin and put the new code in.
Here are some potential places to look on your site (not exhaustive)
- If you use Genesis, look to see if you have the Simple Hooks plugin and check the first box. You can also check under Genesis > Theme Settings > Header/Footer scripts and then in the header box
- If you use Site Kit (I don’t recommend this plugin), you can connect a second tracking code according to their FAQ
- If you use Divi, check under Divi > Theme Options and then in the Integrations tab.
- If you use Astra, check to see if you have Astra hooks in the customizer and see if it’s in there
- If you have Kadence Pro, check to see if you have the custom scripts option turned on in the customizer and check there. You can also check under Appearance > Kadence > Elements to see if there is a hook setup in there.
- If you have the code snippets plugin (we use this often), you might have one called Google analytics or header code so check those.
If you still can’t find it, just install the insert headers and footers and add the new GA4 code.
Thank-you Grayson! I wanted to install it myself on my site, but also be guided by an expert. I appreciate you putting this free helpful resource out there for me and others to follow. It is very handy. And yes, I have now installed as per the instructions and done so successfully. Cheers 🙂
Happy to help!